That sputtering sound, that stubborn refusal to start... a no-spark issue with your Ford 8N tractor is frustrating. But don't worry, this step-by-step guide will help you diagnose and fix the problem. We'll cover everything from simple visual checks to more involved electrical testing, ensuring you get your 8N back to work. For more information on Ford 8N tractors, check out this helpful resource: 8N vs 9N Comparison.
Visual Inspection: The Quickest Check
Before grabbing your multimeter, a quick visual inspection can often pinpoint the problem. Think of this as the detective work – finding clues before diving into deeper analysis. This initial step often saves significant time and effort.
Distributor Cap and Rotor: Carefully examine the distributor cap and rotor for cracks, burns, or corrosion. These are common failure points. Clean off any dirt or grime buildup with a clean cloth. If you find any damage, replace these parts immediately.
Spark Plug Wires (HT Leads): Inspect each spark plug wire for cracks, fraying, or loose connections. Tighten any loose connections. Replace any visibly damaged wires. Remember, these carry high voltage – damaged wires are a safety hazard.
Ignition Coil: Check the ignition coil for any physical damage, such as cracks or burns. These indicate internal damage requiring coil replacement. A faulty coil is a frequent cause of no spark.
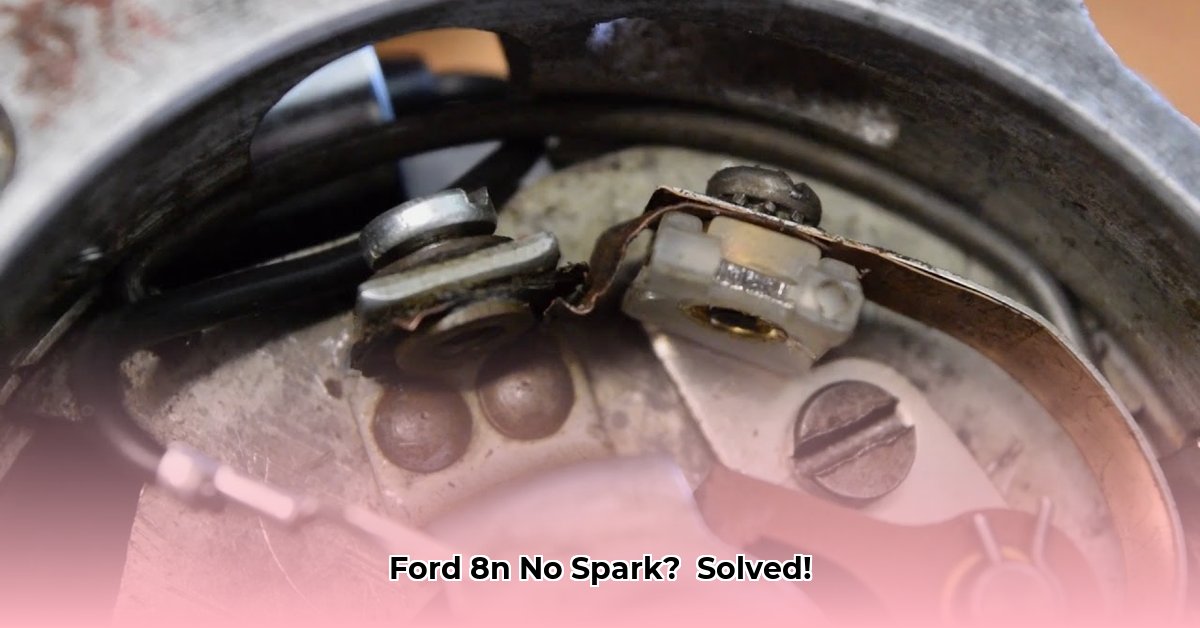
Points and Condenser (If Applicable): If your 8N still uses points and a condenser (rather than an electronic ignition system), carefully inspect them. Clean the points with a fine file (being careful not to remove too much material), and check the point gap. Replace the condenser if it looks damaged or suspect.
Electrical Testing: Let's Get Technical (But Simply!)
Now, we'll use a multimeter to check the electrical circuits. Safety First! Always disconnect the negative battery terminal before starting any electrical testing. This prevents accidental short circuits and protects you from electrical shock.
Battery Voltage: Using your multimeter, check the battery voltage. You should have 6 volts (or 12 volts if you have a 12-volt conversion). A low voltage indicates a weak or dead battery requiring charging or replacement. A low battery voltage is a common cause of ignition problems.
Coil Input Voltage: With the ignition key ON, check the voltage at the coil's primary terminals. You should measure the battery voltage here. If voltage is absent, there's a break in the circuit between the ignition switch and the coil – trace the wiring to locate the problem (and repair or replace accordingly).
Coil Output (High Voltage - Use Caution!): This step requires care. With the high-voltage lead disconnected from the distributor, carefully ground the lead (touch it to a clean metal part of the engine block). While someone cranks the engine, you should see a strong spark jump the gap. A weak or absent spark points to a faulty coil, damaged points, or a bad condenser.
Troubleshooting Flowchart: A Visual Guide
Here's a flowchart to guide your troubleshooting process visually:
                                    Start
                                      |
                              Battery Voltage OK? (6V/12V)
                                      | Yes             | No
                                      V             V
                      Check Coil Input Voltage         Charge/Replace Battery
                                      | Yes             |
                                      V             V
                     Check Coil Output (High Voltage)    Check Battery Connections & Cables
                                      | Yes             |
                                      V             V
                                    Problem Solved        Check Wiring from Battery to Ignition Switch
                                      | No             |
                                      V             V
                             Inspect Points & Condenser; Clean or Replace if Necessary
                                      |
                                  Problem Solved?
                                      | Yes             | No
                                      V             V
                                  Start Over           Seek Professional Help
12-Volt Conversion Considerations
If your 8N has a 12-volt conversion, carefully check all wiring related to the conversion. Poor grounding is a common issue in these conversions. Make sure all connections are secure and properly grounded. If you are not comfortable working with electrical systems, seek professional assistance.
Preventative Maintenance: A Little Care Goes a Long Way
Regular maintenance is key to preventing future no-spark issues. Regularly inspect your ignition system, and clean or replace parts as needed. Consider upgrading to an electronic ignition system – this eliminates the points and condenser, which are frequent sources of ignition problems. This upgrade often results in improved reliability.
Remember: Always disconnect the battery's negative terminal before working on the electrical system and if you are ever unsure about a repair procedure, seek the help of a qualified mechanic. Getting your Ford 8N running smoothly is worth the effort!
Key Takeaways
- No spark on your Ford 8N often points to issues within the ignition system.
- Visual inspection of components for damage or wear is a vital first step.
- A systematic, step-by-step approach, checking components one by one, yields success.
- 12V conversions introduce additional troubleshooting considerations.
- Understanding your tractor's ignition system improves troubleshooting success and prevents future problems.